![]() There are many important aspects that go into streaming a live broadcast. I often have people asking: “Which settings should I use to broadcast a high-quality Flash stream?” Seems like a reasonable question but there are so many variables involved that it’s impossible for me to give a simple answer. My goal here is to explain all of the different factors involved and hopefully give you the knowledge necessary to start Wirecasting like a pro.
There are many important aspects that go into streaming a live broadcast. I often have people asking: “Which settings should I use to broadcast a high-quality Flash stream?” Seems like a reasonable question but there are so many variables involved that it’s impossible for me to give a simple answer. My goal here is to explain all of the different factors involved and hopefully give you the knowledge necessary to start Wirecasting like a pro.
First, I’ll briefly go over the major elements involved in live webcasting, then I’ll go more into more detail on each. These are the most important things to keep in mind:
1) Hardware – Obviously, a better machine will be able to handle higher-quality streams.
2) Bandwidth – If you’re broadcasting from a standard DSL connection, you need to make sure you don’t exceed your uploading bandwidth.
3) Broadcast Settings – Higher quality video streams are taxing on your system and require more upload bandwidth.
4) Multiple Streams – If you’re streaming multiple streams simultaneously, this is going to increase the amount of work your machine has to do.
5) Inputs – Your video source can impact your stream in many different ways. Live sources, in particular, can dramatically impact the performance of your broadcast.
6) Codecs – Some codecs are more efficient than others and they do have limitations to what they can handle. Sometimes you can overload the limitations your video codec and start dropping frames on an otherwise ideal recording.
Hardware
Remember, Wirecast webcasting software is a type of video encoder. For most people, it wouldn’t be surprising if it took a long time to encode a full 1920×1080 HD video on your desktop computer. Still, people seem surprised that Wirecast starts dropping frames when they’re broadcasting at the same resolution!
Wirecast goes through a process called compositing where it decodes all the separate inputs (movies, images, live cameras, etc.), layers them together, then re-encodes them on their way to each destination. That’s a lot of work considering it has to do it at least as fast as real time encoding. If your machine can’t keep up with the quality of your broadcast, Wirecast will start dropping your frame rate to compensate. If you’re just starting to drop frames, you can sometimes get away with it without it being too noticeable but if it starts dipping too low it will become very obviously choppy.
If you’re planning on doing lots of big streams you’re going to need a powerful CPU. Think in terms of multiple cores, not just CPU speed; an eight core i7 will beat your Core 2 Duo and a decent graphics card. In the highly unlikely situation that you are hitting a bottleneck in your record to disk, you may need to upgrade to a RAID hard drive setup or lay down the cash for an SSD.
Bandwidth
There are several different ways that you can broadcast to the web. You can do it yourself (via QuickTime Streaming Server, Flash Streaming Server, etc.), you can use a community streaming website (Ustream, Livestream, Justin.tv, etc.) or you can use a content distribution network or CDN (Limelight, Akamai, etc.).
If you’re broadcasting to a community streaming site, you may run into bandwidth restrictions. If your stream is refused for no apparent reason, I would check to make sure that you haven’t exceeded the data rate limitations for that site. This can also cause problems with random disconnects because the data rate fluctuates and the server may kill your stream when your data rate peaks.
If you’re hosting the streaming server yourself then you have to be careful about how many people connect to your stream. This is less of an issue if you are only broadcasting within a local area network but if you’re streaming to the web, you have to be able to manage the data rate for each individual connection to your stream. If you don’t have enough upload bandwidth then people will start losing quality and getting disconnects. Also, make sure that nobody else on your network is using upload bandwidth. This can be a major issue when streaming from a corporate network where there are lots of users sharing the bandwidth. Still, using a streaming server is the best choice for streaming across a LAN or VPN, assuming you know about how many people will be connecting.
Using a CDN is good way to go for streaming to the web. You can embed the videos directly in your website and don’t have to worry about advertisements in your video. Plus, the only restriction will be your upload bandwidth for a single stream which will be reproduced by the CDN for each person who connects. However, they can be prohibitively expensive for individuals or broadcasters working on a tight budget.
Broadcast Settings
Obviously, the quality of stream you are sending out will affect your performance. Let’s say for example that you found the perfect data rate for streaming 320×180 and you want to upgrade to a 640×360 stream. Thinking in terms of pixels displayed, the total number of pixels in a 320×180 image is 57,600. The number of pixels in a 640×360 image is 230,400 – four times greater. However, codecs are more efficient at encoding larger resolutions, so there is not a one-to-one ratio of pixel size to data rate. Jan Ozer wrote a great article on this exact subject.
It’s important to keep in mind the context of your stream when setting up your encoder presets for a broadcast. You need to think about:
1) How much bandwidth do I have to work with?
2) How much bandwidth does my target audience have to work with?
3) What type of video do I want to broadcast?
First, you need to make sure that your broadcast settings aren’t going to use more bandwidth than you have available. You can calculate this by seeing what your maximum upload rate is (from your internet service provider), and by making sure that your presets never exceed that amount. It’s always a good idea to test running a broadcast first just to make sure.
Second, you need to consider your target audience. If you know that it’s only going to be watched by people on your internal network then you just have to limit yourself to the bandwidth of your internal network. Alternatively, if you’re expecting to be streaming to people who are still on dial-up, you are going to have to dramatically reduce the quality of your presets to compensate.
Third, you need to keep in mind the type of broadcast you intend to do. If you are doing a low action interview then you can probably reduce your frame rate and use a conservative data rate without losing too much quality. If you are broadcasting a high-action sports event, you’re going to need a higher frame rate to avoid choppy video and a higher data rate.
Typically, when setting up for a broadcast, I experiment a bit with my data rate beforehand. I start it out a bit high then bring it down little by little until I can get it as low as possible without impacting the quality of my stream. If I’m expecting a higher-action stream then I’ll wiggle the camera around while broadcasting to see if my frame rate starts to drop. If you are starting to drop frames on a broadcast that’s using a preset with more than 30fps (which is rarely necessary), I would recommend lowering your frame rate a bit to maintain quality and reduce your data rate. Typically, I think you can get away with as low as 24fps (standard film) on a stream without it looking too choppy, I would caution against going much lower than that unless you’re working within very specific restrictions.
Multiple Streams
It’s important to remember, again, that Wirecast is encoding its output on the fly. Sending simultaneous streams works great but will dramatically increase the impact to your machine.
I regularly stream 6 simultaneous streams from my Mac Pro. One high and one low quality QuickTime stream, one high and one low quality Flash stream, one iPhone stream (via Wowza server) and one QuickTime record to disk. However, a lot of fine-tuning was required to make sure that each stream was using exactly the right data rate, resolution and frame rate to give me the quality that I wanted and I am just on the edge of exceeding the limitations of my machine.
Here’s a little known trick to Wirecast that allows it to identify if you are using identical broadcast and recording presets: If you have a broadcast and a record to disk using an identical preset, Wirecast will match them up so it doesn’t have to do the encoding twice. This is helpful if you’re already pushing the limits of your setup and want to get a recording of your broadcast at the same time.
Inputs
Wirecast is great at managing a wide variety of input sources, so you can easily have several live camera sources feeding into your Wirecast machine. However, really high-quality video sources may end up causing you more harm than good. Let’s hypothetically say that you’re bringing video in from an HD camera, dropping it into Wirecast’s canvas (set to an HD resolution), then broadcasting back out at an HD resolution.
That is a lot of information to be going through your graphics processor (GPU). If your frame rate starts to drop but your CPU usage is staying steady, you’ve hit a bottleneck. Try reducing the frame size going through Wirecast. There’s no need to bring in a 1080p video input if you’re only streaming out to 640×360. Also, always remember, resizing down is okay but resizing up is not.
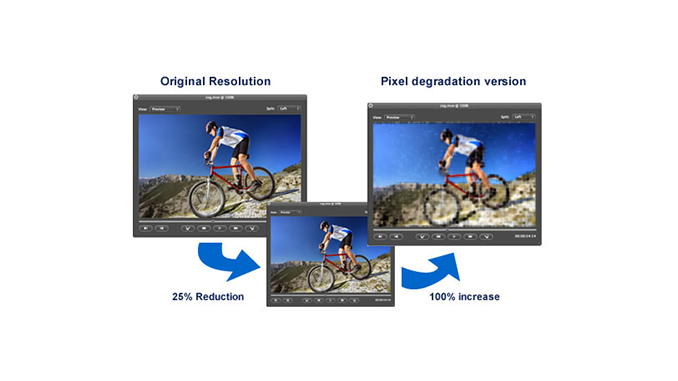
![]()
Above is an exaggerated example of resizing an image from the input to the canvas to the output. By reducing the high-quality source to fit into the lower-quality canvas the output has become extremely pixelated and blurry. As a rule, you should try to keep your resolution as constant as possible from source to output. You get no benefit out of having your HD camera at native resolution if you’re only broadcasting a 640×360 stream, all you are doing is increasing the amount of work your machine has to do and you may end up getting reduced quality.
When using a live source, Wirecast has three potential resize steps.
1) Device Capture Size
2) Wirecast Canvas Size
3) Encoder Preset Size
Your goal should be to bring your Device Capture Size and Wirecast Canvas Size down as low as possible without your Device Capture Size being smaller than your Canvas Size or your Canvas Size being smaller than your highest broadcasting preset size. The Device Capture Size is dependent on your input source so it’s good to experiment a bit with Native, Reduced and Low settings before picking one for your broadcast. Also, many HDV cameras have the ability to switch to a DV mode – which is probably a good call if you aren’t planning on using an HD resolution.

This diagram helps to illustrate the different resize steps your video goes through in Wirecast. The base resolution is dependent on whatever your live source is. It is then scaled down based on your Device Capture Size. The video is then scaled to match your Wirecast Canvas Size. The last step scales it to whatever your highest broadcast preset resolution is. Smaller broadcast presets are automatically resized down from there. Keep this sequence of resizes in mind as you set up your document to ensure the highest possible quality for your output.
Codecs
Video codecs, by design, have their own built-in data rate limitations. It should be pretty rare that you start exceeding the limitations of your video codec but it’s something to consider for very high-quality video. For example, the Apple H.264 codec claims it can go as high as 135,000 kbits/sec (Level 5, Main Profile) but I’ve found in practice that it’s quite a bit lower than that. If you start to encounter issues with the inefficiencies of the Apple H.264 codec, then you should probably switch to an unrestricted format like Apple Intermediate Codec or Apple ProRes. Be careful though, these are large uncompressed formats and will eat up the space on your hard drive very quickly.
Summary
Hopefully this overview has helped illustrate some of the different elements involved in the broadcasting process. Finding the right balance between all of these components is key to getting a high-quality broadcast.