When configuring your broadcast, bear in mind that any changes in video size or dimension, will cause compression and loss of quality. To ensure the highest possible quality, it’s important to maintain a constant resolution and aspect ratio from source to output. The following steps detail one easy way to do this.
1. Initial Setup
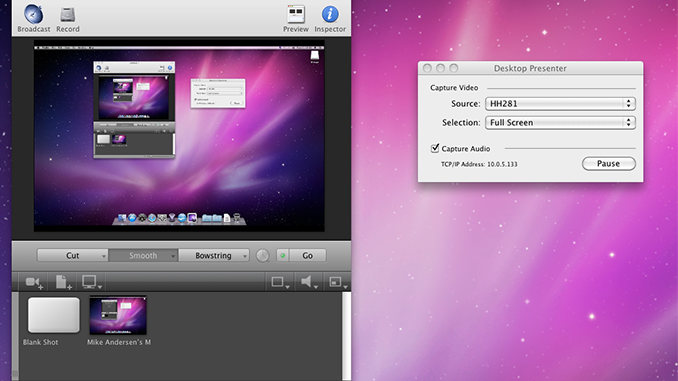
To begin, I have created a new Wirecast document and included a Desktop Presenter shot. In this example, I’m using Desktop Presenter on the same computer but this works just as well with multiple machines.
Here’s what it looks like so far…

Wirecast defaults to a canvas size of NTSC 720×480 (3:2). This doesn’t work for us because we’re planning on broadcasting at 1280×720 (16:9). If we export with this canvas size, the output will be horizontally stretched to look like a 16:9 source and the video will be scaled up to match the larger resolution.
Here’s a sample of what my output would look like if I didn’t change my canvas size:

To avoid this, change the canvas size to 720p (File > Canvas Size > 720p (1280×720)). You should see the preview window change to a 16:9 aspect ratio. You might also see black bars appear on the sides of your video if your monitor is not using a 16:9 resolution. Next, we can make our Desktop Presenter output exactly 1280×720 by selecting “Custom, Centered” from the Selection drop-down menu. Then enter 1280 for the width and 720 for the height.
At this point, you should be seeing something like this:

Note that Desktop Presenter perfectly fills the preview area in Wirecast. Also note that you can no longer see things like your start menu or desktop icons. Desktop Presenter is now being focused on an area 1280×720 in the center of your screen. By focusing Desktop Presenter on this one spot, we have control over the exact size of our source which is key to getting a crisper image.
This may not work depending on your workflow so feel free to adjust these numbers a little bit. Just keep in mind the best quality will come from Desktop Presenter capturing the same size area as your output or at least the same aspect ratio.
Side-note: This may seem counter-intuitive because wouldn’t you want the highest resolution source for the highest quality output? Why not capture as much of the desktop as possible? Well, in certain circumstances that’s correct, but not in this case. When dealing with a video source that has a lot of fine text or detail, scaling down can lose data that makes it harder to read the text. If you were bringing in a 1920×1080 source and scaling down to 1280×720, you will end up having to lose some pixels and that often means text becomes unreadable.

2. Encoder Settings
The encoder settings really depend largely on what you need the video to do. In a low-action video, even at 720p, you won’t need a tremendously high data rate. Still, it’s always a good idea to experiment a bit to find the right data rate for your broadcast. Typically, you want to balance between system resources and data rate. Try increasing the data rate until you start dropping frames or maxing our your CPU/Bandwidth, then dropping the data rate back down to something more stable.
Also, test your video quality with GPU Compression turned on or off. You can access this from File > Preferences > Advanced > Use GPU Compression. GPU Compression can reduce the load on your system by passing off the compression to your graphics card. However, this can cause a negative impact on the quality of your stream with certain graphics cards. It’s best to experiment and see which gives you the best quality.
Here’s what the preset I was testing with:

3. Adding the Source
Next you want to launch the application you are going to use as your source. In my example, I’ve used Google Earth.
When you first launch the application, it will not line up with your Desktop Presenter area. You will need to re-size the application to fit in this area. This is good because it puts the burden of scaling and resizing on the original application rather than on the encoder, which will reduce quality.
See the two screen shots below showing the application when first launched and again after I’ve re-sized it to fit within the Desktop Presenter area. You can use the corners of the preview area in Wirecast to help line it up with your application.

Just opened Google Earth…

Re-sized to fit the preview area of Wirecast…
4. Recording
At this point your recording should be a high-quality and crisp output. The most important thing to remember about this is the consistency in resolution and aspect ratio.
Take a look at the two outputs below, comparing the default setup to the finished setup.
Default Settings: 1920×1200 (Desktop Presenter) –> 720×480 (Canvas) –> 1280×720 (Output)

New Settings: 1280×720 (Desktop Presenter) –> 1280×720 (Canvas) –> 1280×720 (Output)