We’ve had a lot of questions about our new Mp4 web export format in ScreenFlow 4, so I thought I’d take a little space here to explain in depth what changed, why, and what some of the settings mean.
 What changed and why?
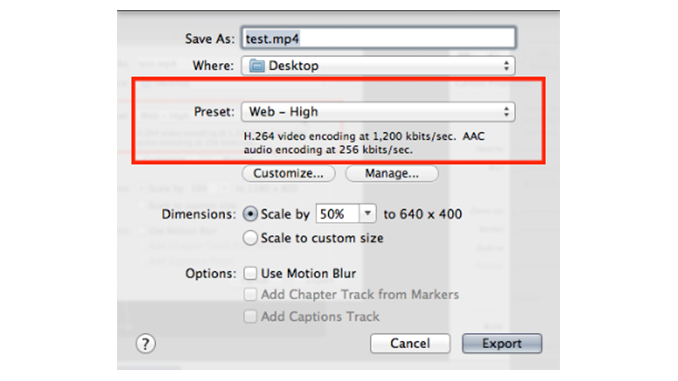
As a quick overview: the ScreenFlow 4 Web-High and Web-Low encoding presets now use the x264 codec to encode to H.264 video format, wrapped in an MP4 container. (As a comparison, ScreenFlow 3 presets used the Apple H.264 codec to encode H.264 format, and wrapped it in a .MOV container).
What are Codecs?
Codecs are like translators; they tell the program and hardware how to encode and decode a file for optimal viewing. (The word ‘codec’ literally comes from a contraction of COmpressor-DECompressor (or COder-DECoder). ) The goal of most lossy video codecs is to compress the data enough to keep file sizes low, while not sacrificing too much image quality.
Apple H.264 and x264 are just two of the available codec implementations that encode to the H.264 compression standard. X264 is considered by many (including us!) to be the best choice in terms of quality and file size for the H.264 file it renders. Moscow State University, Graphics & Media Lab Video Group, an authority on compression, tested and verified that x264 is the best choice in terms of quality and file size for the H.264 file it renders. Here’s a report of their most recent comparison of various H.264 codecs. (If you really want to geek out, here’s MSU’s full report. They do this test every year.)
What is a container?
A container is, essentially, a bundle of files. Usually a container consists of a video codec and an audio codec, though it can also contain things like subtitles. The main difference between different containers is not only the codecs they support but what other features they support—like subtitles, chapters, and metadata.
MOV was originally developed by Apple as a file format for its QuickTime movie player. The International Organization for Standardization (IOS) approved the QuickTime file format as the basis for the MPEG-4 file format specification. By 2000, the MPEG-4 formats became the industry standard. (http://en.wikipedia.org/wiki/QuickTime#QuickTime_and_MPEG-4)
Both containers MOV and MP4 support H.264-encoded video files, and they are almost interchangeable in a pure QuickTime environment, but MP4 has wider support outside of the QuickTime environment. Most, if not all media players, support the Mp4 file format. Even in handheld devices like video players and gaming devices, you are more likely to find .MP4 compatibility than .Mov. In fact, even Apple is moving away from QuickTime framework to AVFoundation. (QuickTime X and Final Cut Pro X are examples.)
So in sum:
- MSU tested and they determined that x264 is the best implementation of H.264 (Quality relative to file size)
- QuickTime MOV was the basis for MP4. MP4 was made the International standard by IOS
- While MOV and MP4 are nearly interchangeable in QuickTime-based programs, MP4 is the broader standard.
By changing our web presets to x264 codec in an Mp4 container, we believe we have improved the compression quality (higher quality at lower file sizes), as well as the usage options for Web exports.
(All that being said, it’s still possible to export to Apple H.264 in a .Mov container by using our Lossless preset.)
What do all the customizable settings mean?
So now that we’ve explained the reason behind the change in our Web export presets, what do all the new customizable settings mean? Here is a brief explanation of each setting:

H.264 Video: Uncheck this when you do not want your exported file to contain video tracks.
Frame rate:
Video is essentially a series of separate still images displayed quickly enough to fool our brain into thinking it’s seeing a moving object. “Frame rate” is the term used to specify how quickly these individual images are displayed per second (i.e. frames per second (fps)). So if you export at 20fps, that means your eyes are processing one still frame every 1/20th of a second. The higher the frame rate, the more data there is in the outputted file, the higher the file size will be.
There a lot of factors to consider when choosing the optimal frame rate, including your source video(s) and the content of your video. But the goal is to create a smooth, high quality-looking video output.
If your frame rate is too low, the video will seem to stutter or jerk – because your eye is perceiving the frames individually, rather than seeing them as continuous. But as you raise your fps, there’s a point at which your eye will not perceive any visible difference. Also, it is possible that if the frame rate is too high it could blur the details of the animation and take so much computer processing power to view that it results in the overall deterioration of your video. In this case the effect would be similar to having a frame rate that is too slow – it would appear to stop and start.
Digital video generally uses 30 fps, motion pictures (cinema) uses 24 fps, and NTSC TV is around 30 fps. Generally, 12-15 fps can produce pretty good results for the web, (again, depending on your source content), and at this rate, your file sizes will be lower than at 30 fps. But you’ll want to try some tests with your own content.
Data rate:
Data rate (also known as bitrate) is the amount of data that is used for each second of video. In the video world, this is often measured in kilobits per second (kbps).
Like frame rate, you’ll want to find a good compromise between a high and low data rate.
Too low and you’ll lose detail and start to see chunked areas in your video. Too high, you’ll have a larger file without a significant increase in quality. If you’ve ever watched an online video that stopped and started repeatedly, it probably had a high data rate.
I recommend starting with a data rate of around 1000 kbps for a video that does not have a lot of action and motion in it. If the quality of the exported file seems poor, then try again at a higher rate, noticing the quality/size changes to see what you’re comfortable with. In ScreenFlow 3 web exports, the data rate defaulted to “Automatic”. This tended to create a larger file – though the image quality was also very high, sometimes unnecessarily high. Your best bet is to do some experimentation on your own files and see where you feel most comfortable in that quality/size tradeoff.
Profile:
There are various encoding techniques and algorithm options (profiles) that can be used by the codec to compress your file. The Profile controls the degree of sophistication in encoding and decoding. The basic tradeoff is enhanced quality and a more complex file that’s harder for the viewing device to decode vs lower quality but easier decoding.
Baseline profile: This is the simplest profile; quality is good, but not as high as videos produced using the Main Profile. But because it uses simpler encoding techniques, the decoding requirements of a Baseline-encoded video are also less. Additionally, older iOS devices, and many Android devices only support playback of H.264 media using the Baseline profile. Use this profile for faster, simpler encoding for media with limited scene changes; and for improved compatibility for playback on mobile devices.
Main profile: This profile is compatible with most devices and offers better compression than the Baseline profile. This profile results in longer encoding; it was designed primarily for SD digital TV broadcasts. It is well-suited for playback on desktop computers.
Automatic profile: This option allows the codec to determine which profile to use, based on the size of the input video.
AAC Audio: Uncheck this option when you do not want your exported file to contain audio tracks.
Advanced Audio Coding (AAC) is a lossy audio format for digital audio that typically produces better sound quality than MP3 at similar bit rates. Both of the options below, like the frame rate and bit rate for video, allow you to balance the quality of your audio vs. compression and file size.
Sample Rate:
If you choose 48 kHz, it means you’re sampling your source sound wave 48,000 times per second. Choosing 44.1kHz samples at 44,100 times per second. So as you might expect, the 48k file will be slightly larger. Depending on your content you may or may not be able to hear a difference between the two options. Standard CDs are sampled at 44.1kHz. 48k sampling is used by some high-end recorders, but is rarely used for casual music files.
Data rate:
Data rate for audio is just like the data rate for video – it determines how much data is used for each second of audio. Generally, 128 kbps sounds pretty good for casual listening, but if you have lots disk space and your listeners will be using high quality equipment, you might be better going with 192 kbits or higher.
But really you should let your own ears decide. Pick 4 or 5 of your typical videos, encode them at different rates and perform your own blind listening tests on your own sound gear. Then you’ll know what works best for you.
In summary
In general, keep in mind that we developed our presets to be an easy, quick way for you to export your video for various purposes, WITHOUT needing to have in-depth knowledge of codecs, containers and compression! So our Web-High and Web-Low presets will work for most people exporting video for the web. But I hope this more in-depth information helps explain some of your options so you can make more informed encoding decisions.
Your best bet is to try some of the different options with YOUR content and see what works best for you in terms of file size and playback quality.
Can the mp4 file be played in a Flash Player? The main reason I used H.264 was because it would play in both Quicktime and Flash Players so my users did not have to download and install a plug in.
HI Owen,
Yes, H.264 .mp4. plays in Quicktime, Windows Media Player 12, Flash, and iOS devices.
I was just exporting a new video for work today and had to play around with the settings and it was the first time I had to change my export settings so I was shocked to see the differences, so a big thank you for this post explaining them all.
Is there a way to have an estimated file size, based on the settings chosen, before exporting? I spent 1.5 hours changing the different settings and exporting over and over again, to keep my file size under 75mb. That was a lot of time for trial and error.
We don’t have a clearcut way to estimate file size based on the settings chosen. (other than to export a short region — say 10% of the total — and extrapolating the final size based on the size of 10%).
Though it seems like there should be a utility that would do that. Does anyone know of such a utility?
This is exactly how we do it for our work:
– Duplicate the SF project in Finder
– Open the duplicate
– Cut 90% of the project (keep the scenes with the most activity)
– Export it at various different settings
– Look at the quality and file size of the project
– Pick the one with the smallest file size with NO visual impact on quality
– Rinse and repeat as needed
– Throw away the duplicate project in Finder
Thanks Veit, it’s great to see step-by-step how others test their content at various settings. Great workflow.
The free VideoSpec includes a bitrate calculator called BitRatePro. Enter the duration and the data rate and you get the file size estimate. If you want to target a specific file size, enter the duration and file size and it’ll give you the data rate you need.
VideoSpec also is a great file analysis tool if you want to examine the specs and metadata of a file.
VideoSpec
http://videospec.free.fr/english/
The person who designed the BitRate Pro portion also has this simple web app for calculating as well.
http://www.pimley.net/bitrateinfo/
For iOS devices There are these options as well.
I like this on the iPhone
https://itunes.apple.com/us/app/vidbitcalc/id447847515?mt=8
but this one is free
https://itunes.apple.com/us/app/bitrate-calculator/id542109749?mt=8
Thanks CraigS, these are great suggestions.
Just keep in mind that bitrate calculators don’t know about the content of the video, which has a huge influence on the size of the project.
Imagine the following test: Paste 60 seconds of high-action scenes into Screenflow and export as video 1. Paste a grey PNG into Screenflow, extend it to 60 seconds on the timeline and export it as video 2, with the exact same parameters as video 1. You’ll see that video 1 and video 2 have completely different file sizes. In fact, I bet you that video 1 is at least 3x larger than video 2.
In other words, take the output from a file size calculator with a grain of salt.
Excellent article – covered the principle topics very well.
I’ve been reading a bit about deinterlacing lately and I suspect it was a feature of an older version of Screenflow. Has that been removed? I thought it was a setting in the export function.
Deinterlacing was in V3. However, deinterlacing is not a straight-forward process; there are a number of parameters that really influence how well deinterlacing works. We always deinterlace assets before we bring them into Screenflow and I’d recommend you do the same. Apple’s Compressor has very good settings for deinterlacing – we usually use the “blur” option for tough deinterlacing jobs. Handbrake might be another option, although you don’t have as much control as you have in Compressor.
If you record interlaced straight into Screenflow, I’d recommend you export and then use Compressor to deinterlace.
i’d love to see an option for deinterlacing back in screenflow v4+.
deinterlacing assets outside screenflow can bring the advantage of the best optimization, but it has at least two huge disadvantages:
1) it is a time consuming process and eats up disk space
2) it requires an additiona encoding step, which will definitely not improve the visual quality of the asset
plus, it looks like handbrake cannot effectively deinterlace/decomb the video i have exported from screenflow, so i am forced to deinterlace/decomb them before importing.
Hello, in version 3 of ScreenFlow there was the option to set “Internet Fast Streaming” as you can see it here http://o7.no/VQwH28. With this new version this option is gone. Is this feature now automatically integrated?
Hi Robin,
In version 4, the MPEG-4 output option automatically sets the video to Internet Fast Start, which means that your movie index information will be stored at the front of your movie file, and as soon as that’s loaded, your movie can start playing (rather than waiting for the entire movie to download before it starts playing).
Great tutorial. Thx! 🙂
Now, is there any way to trim down the size of the raw footage that is captured? Here’s why…
I’ve been using ScreenFlow to capture usability testing sessions that generally last between 30 – 45 mins. The problem is that the raw footage is gobbling up between 10 – 20GB of space per session.
And then, it takes a little over an hour to Export the video to a smaller file size so I can dump the original recording and reclaim the space. I have an 240GB SSD, with generally 50GB to spare. But I can’t do more than 2, maybe 3 test sessions in a row because I run out of space.
While I could just add an external drive to solve some of the problem, the processing time (an hour to convert a ~30 min video from ~10GB down to ~200MB) is a bit of a drag right now. So I’m looking for ideas to improve my workflow.
Btw, I won’t ever post any of these videos on the web. They are for internal review only. I don’t do any editing or post-production. Just capture, and review with the Dev team. So I don’t need particularly sharp quality. The main thing I want is the fastest export and the smallest file size possible. Thx!
Hi Patrick,
Thanks for posting. To answer your question, no, at this time there’s not a way to capture ‘low quality’ to keep the raw file size down. But thanks for the great explanation. I will add this as a feature request, along with your reasoning.
Thx for adding as a feature request Lynn.
I recorded short video on my digital camera in MTS format which ScreenFlow does’t support. I converted it into MOV, MPG, M4V formats. However, SF does not open them. I get message: The document “00005.mov” could not be opened. ScreenFlow cannot open files in the “QuickTime Player Document” format.
Which formats SF supports? How do I open video that is not recorded by SF?
Thank you
Hi Adam,
ScreenFlow supports video and audio file formats and codecs that QuickTime Player can play back in Mac OS X10.6.x or higher. The current list can be found on Apple’s site: http://support.apple.com/kb/HT3775
I suspect that even though you are converting your file to MOV (which is a container format), the underlying codec is not H.264 or a format that ScreenFlow recognizes. If you right-click on your movie file and select Get Info, you should be able to see what Codec encoded the file. Is that codec something that’s listed on Apple’s list on the site above? Many people use Handbrake to transcode their video files. We also sell a product called Episode that does that, though for one-off encoding it’s probably more expensive than what you’d be looking for.
I would recommend that you encode your video using ProRes or Animation, (both of which will preserve the original quality more than a compressed format will). But, even if you can encode to H.264, that should allow you to import that into ScreenFlow.
Is there any way to add markers and export with those markers so they show up in quicktime (just like in FCPX)?
Yes, in the main export window select the check box next to “Add Chapter Track from Markers”.
Is that what you were looking for?
Hi Lynn,
What would be the best setting to export for a 2 – 5 minute screen capture video on YouTube or Vimeo? Also, what size would be optimal to scale the video down to. I am using my laptop to record the tutorial video. But if I want to export the final video to YouTube or Vimeo and take account that someone will be viewing this on a mobile device I am completely at a loss. Does this make sense? Sorry, I am a rookie.
Thanks.
HI kevin,
All good questions. Generally, there are 3 areas to pay attention to when you’re creating a video: the resolution of your video, the encoding settings for exporting that video, and the display of that video.
When you upload to a platform like Vimeo or YouTube, they will handle optimizing the display of your videos on mobile devices. So I would not worry about that.
Also, if you’re just going to Vimeo or YouTube, I would recommend using the Publish to.. Vimeo or Publish to YouTube export options in ScreenFlow. These are set to the encoding settings recommended by each platform for the best results.
So that leaves the capture of your video: I would recommend that you read the post on Screen Resolution, which will help sort out some of the questions around what resolution to CAPTURE your screen at .
If you want to export to other places and want to use the Web Export settings, I would recommend that you do a few test exports with your content. Start with the default settings, and then try adjusting the framerate or the datarate – which will affect the quality and size of your video. YOu want to make sure you keep your files relatively small (shorter loading time/less buffering) without sacrificing quality too much.
Thanks Kevin, and have fun!
Is it possible to export to webm in some way?
At this time, not through ScreenFlow. You can use a 3rd party encoder to take your ScreenFlow export and re-export to WebM. Telestream has Episode encoder that can do that.
Hi Lynn,
I have a question about the Publish to Vimeo feature. Suppose I previously published a video in 720p using Screenflow 3.x. Now that I have Screenflow 4.x which supports 1020p when using Publish to Vimeo, if I re-publish the video in 1080p will it automatically replace Vimeo video file or will it create a new video?
Thanks!
Bill
it will republish the video.
it will republish the video.
Hello,
I use Screen Flow to create customer support videos which we embed directly in our application interface via the HTML5 embed tag. We make two versions: MP4 and Webm. Do you know of a way to retain the chapter markers? I love that feature for Quicktime. Do FF, Chrome, and/or Safari support that?
“For better results, adjust your Quicktime settings to prepare videos for internet streaming.”
^^ I’m getting that message when I upload a “Web-High Quality” video from ScreenFlow 4 to YouTube.
Do I have a setting wrong?
Have you tried using the Publish to YouTube export?
Hi there,
Excellent post.
I use screenflow to record video only from the iSight camera of my Macbook. The raw file is about 15-20 Gigs for a 3-4 hour video. However, using the web Hi preset, it takes another 12-14 hours for the export which is too long.
My questions are
1) Can i transfer the file to my windows machine and start exporting from there as that would save me some hard disk space and lot of time too. How i wish screenflow was available for windows too. But there must be some software to do this, is it?
2) Any option to record and keep exporting at the same time? Or record directly in MP4 format? I dont need any editing on them.
3) Can i use handbrake to convert screenflow format files?
Hi,
I’m also getting the warning message of “The document “filename” could not be opened. ScreenFlow cannot open files in the “QuickTime Player Document” format. I have checked the file info and it is a .mov filetype with a codecs of H.264. I’m also using OS 10.7.5 so I’m clearer greater than the 10.6 or later your documentation states.
I’ve tried MOV files exported from Keynote, I’ve tried MOV file types from iPad and iPod and nothing seems to work – do you have any suggestions on what I may be missing here?
Thanks in advance
HI Marie
How are you trying to open these .mov files with ScreenFlow? Are you clicking on File>Open?
If you get this message when adding to the Media Library, you might have a QuickTime plug in installed that is preventing ScreenFlow from recognizing these .mov files.
I would suggest you contact our support department if you need help troubleshooting http://www.telestream.net/telestream-support/screen-flow/contact-support.htm
Thank you so much, this info is exactly what I needed. Plus you were very thorough and made it easy to understand for those of us not in the video editing career track. This page was actually invaluable to me. Yes you can quote that 🙂
Cheers!
Meilani
Meilani’s Blooming Business Club is now open, wooho!
Hi,
I just started and read so many things about exporting an settings, etc, but I am putting on youtube and realize I have no need for the .mov that is produced.
Can I skip exporting and just publish my .screenflow project to youtube?
Thanks!
Barry
Of course! Under the “File” tab just above “Export” is a “Publish To” option. Just click there, and then Youtube!
Hello and thank you.
Where can I modify the presets for youtube?
Thank you
Hi Stefano,
It is only possible to modify the resolution at which the output will occur, but manually changing the setting is not an option at the moment.
Good luck!
Lucas
Hello Lucas,
This is a bit of a productivity drag, since the presets don’t work for me. They produce overly big files.
Can I change them myself hacking through the code? where would I need to look?
Thank you!
Actually it is much easier than that! The export to YouTube option is a great way to cut out some time and upload your videos directly, but it does limit your options.
It takes some time, but you are able to simply export your videos to your desktop, for example, and then upload to YouTube. By doing this, you add an extra step or two to the process, but you have much more control over the export settings.
Hope this helps!
Lucas